August is fading fast, the breezes are cooling off, and the first hints of fall are showing themselves.
As much as I hate the heat and as much as I look forward to cool weather and bundling up in warm woolen mittens, I dread the loss of sunshine.
I was at Knittin’ Pretty in West Jordan, Utah last week and my eye was caught by a delightful yellow yarn. Now, if you know fabrics and yarns, you’ll know that pretty yellows are very difficult to find. I was told once that this is because yellow is the most expensive and the most difficult color to dye fibers. It doesn’t take well and the colors can be unpredictable. So you can imagine the joy of finding a bright, sunshiny, pretty, happy yellow!
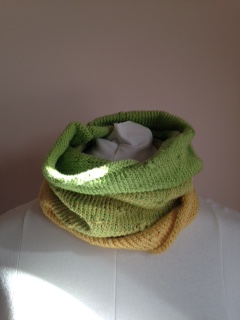
It’s Cascade Yarns Heritage Silk. It’s a light yarn that calls for a 1-3 size knitting needle that is 85% superwash merino wool and 15% mulberry silk. it’s heaven to touch and the colors are bright and beautiful. Knittin’ Pretty carries it in a variety of colors. I chose Citron, a bright pretty clear green and Lemon, a bright lemon yellow.
I thought about the pattern I wanted to do for several days, researched some on Pinterest and Ravelry and didn’t find anything that I liked. I wanted the bright and beautiful color to be the main focus of the cowl but wanted to add a little visual interest since these are very straightforward colors without variegation or texture variations. I was looking through some books and stumbled onto a stitch called the Knot Stitch. I thought this would be a fun and easy way to add a little visual interest to the cowl.
What you’ll need:
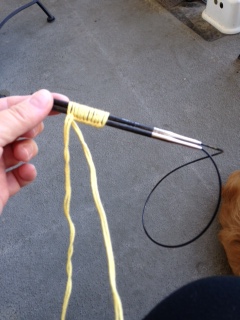
1 skein Cascade Yarns Heritage Silk in Citron, divided into 3 equal balls
1 skein Cascade Yarns heritage Silk in Lemon, divided into 3 equal balls
1 size 7 circular knitting needle, anything from 16 to 24” would work although 16 is easier for joining a narrower cowl.
Stitch markers
Process:
I had each skein divided into thirds and wound into individual balls to make the process easier. I believe they do the dividing based on weight which is the easiest way to the equal amounts into each ball. After dividing, I had six balls of yarn total, three in yellow and three in green.
Holding two strands of yellow together, CO 120 onto the circular needle. I like to hold both ends of the circular together as I’m casting on. This prevents me from having too tight of a cast on and struggling with starting the first knit row. Makes life much easier.
I place stitch markers every so often so that I don’t end up counting the cast on stitches over and over again (it’s one of those memory issues I’ve learned to work around). In this cast on, I placed a marker every 20 stitches to make keeping tracker of the total number of cast on stitches easier.
Once you’ve cast on your 120 stitches (or more or less depending on how large you want the circumference of your cowl to be), pull one end of the circular out and join in the round, using care to not twist the stitches. Place a stitch marker at the join. If you twist them you’ll end up with a mobius rather than a regular cowl.
Begin your knit rows. Because the bottom few rows of a cowl tend to curl a bit, I knit around 6 or 7 rows before I started placing any knots.
I did not use any particular method to determine where to place my knot stitches. I would hold up the work and decide, “Yup, I want a knot here.” You can make the placement of knots as dense as you want. I was going for a polka dot kind of look so I tended to offset them, going for a less dense look, and would sometimes knit a few rows without any knots.
Knot Stitch Instructions: Move yarn to front, purl 3 stitches (if you’re holding two strands together you’ll have 2 strands for each stitch, making a total of 6 strands), leave on needle. Move yarn to back, knit 3 stitches. Move yarn to front, purl 3 stitches and move stitches to other needle. I am a tight knitter and I found this stitches were easier to do if I wiggled a little ease into the 3 stitches before I completed the knit or purl of them together.
There is a good video on youtube that I used to figure this stitch out. I’m a new knitter and sometimes I get confused. This video helped. *note: this is not my video.
Continue knitting in the round and placing your knot stitches with the two strands of yellow until you’ve reached about 1/3 of what you want the total height to be. I wanted something that I could pull up over the top of my head and cover my ears with because I live somewhere quite chilly so my cowl is about 18″ tall which scrunches down nicely, is cozy and warm, and can still be pulled up over the top of my head on windy days.
When you’ve reached your 1/3 of height point, snip one of the strands of yellow and join a green. Now you’re holding one strand of yellow and one strand of green together.
Knit in the round, placing your knot stitches as you like, until you’ve reached about 2/3 of your total height. At that point, snip the remaining yellow strand and join a green. Now you’re holding two strands of green.
Knit in the round, placing your knot stitches as you like, until you’re within an inch or so of you’re desired finished height. Knit seven or eight rows without knots (because this section will roll and the backs of the knots aren’t as attractive as the fronts.
Bind off with your favorite method and you’re done!